September 18, 2016

Getsitecontrol Review : Free Subscription Pop-Up For Wordpress And Blogger


One of the biggest problems that most bloggers face is retaining their visitors. There are many plugins and tools like SumoMe, which help you to convert your visitors into subscribers along with several other features.In this article, I am going to review one such tool, GetSiteControl, which is a simple yet very effective replacement for SumoMe. So let us go ahead with the review.

GetSiteControl is a tiny web-based tool packed with all the visitor engagement widgets a blogger may need. It comes with free as well as premium plans. As against SumoMe, at GetSiteControl, most of the essential features are free. GetSiteControl is one of the first tools that I’ve used since I started my blogging career. It can be used with WordPress, Blogger, Joomla, Tumblr, Weebly, Shopify and all other Blogging platforms which allow you to add custom codes.

Register Free With GetSiteControl  GetSiteControl Widgets Though GetSiteControl is a Freemium tool, all its features are available to free users with certain restrictions. We will discuss the restriction part later in the customization section.

Registering with GetSiteControl gives your access to the following widgets.

1. Subscribe Widget  The Subscribe Widget is what I love the most about GetSiteControl. It has a beautiful Interface and is very easy to customize unlike most other Opt-In Forms of WordPress. It saves a list of subscribers on its servers, and you can download the same in excel format even with the free plan. The subscribe widget can also be integrated with Mailchimp, Aweber, Constant Contact, Campaign Monitor, Active Campaign and Mad Mimi.


2. Promo Widget  As the name suggests, the Promo Widget can be used as a Call To Action pop-up to take the customer to your sales page. As with the subscribe widget, it is very easy to design it. You have full control over the pop-up text, button text, and all the colors. A promotional pop-up can be created in less than a minute.

3. Follow Widget  This widget lets you add Social Follow link of all the major Social networking sites to your blog. The Social Networks include Facebook, Twitter, Google+, LinkedIn, YouTube, Instagram, Tumblr, and Pinterest.

4. Share Widget  The Share Widget lets your visitors share your content across all the major social platforms including Facebook, Twitter, Google+, LinkedIn and Whatsapp. It also allows sharing of the content through E-mail.

5. Contact Widget  The Contact Widget lets you add a simple Contact form anywhere on your website. You can easily add all the basic options needed along with radio buttons, checkboxes, and drop-down lists

6. Chat Widget  GetSiteControl also has a chat widget which you can use to integrate the chat feature within your blog for interacting directly with your visitors.

7. Survey Tool Widget  The Survey tool widget helps you to quickly create a Survey for your readers. With the free version, you can create a simple linear survey. However, if you are looking out for logical surveys with branching, you will have to upgrade to the Paid Version.

Features of GetSiteControl
Can be used with any blogging platforms which allows adding custom codes.
Use all the widgets at nine different locations.
Easy to customize the Text, Fonts, Colors, Buttons and Images for all the widgets.
Automatically match the color of your widget with your theme color.
Exit pop-ups for visitors leaving your website.
Show the widgets to visitors matching only specific criteria.
Integrate data from Subscribe and contact widget with all major email managers.
Enable Autoresponders and double opt-in for the subscribe widget.
Show a thank your message to your subscribers or divert them to a Welcome Page.
Download subscribers right from your GetSiteControl Dashboard.
Advanced A/B testing by creating multiple instances of the same widget to find which widget performs better.
Detailed statistics in Dashboard for each widget.
Ability to integrate Google Analytics to show data as events.

Customization Of Widgets  GetSiteControl is a Web-based tool. Hence all the customizations are handled from its website. To customize set-up or customize a widget, you just need to login to your GetSiteControl account and choose the widget to set-up or edit.
From the GetSiteControl Dashboard, you can enable A/B testing by creating multiple instances of the same widget to check which one performs better. This, however, is a paid feature not available to free users. 


GetSiteControl Dashboard  Since all the above widgets can be customized in a similar way, I am going to show you screenshots of the Subscribe Widget only.

Appearance  GetSiteControl offers you to display each widget at any of the 9 different locations it offers. This allows you to fit them on almost any website. You can also use the same widget at two different locations. GetSiteControl also allows you to customize the looks of the Widget as well as Button by changing the background color, text color, button color, and fonts.You may either select a color from the palette or use your theme colors as detected by GetSiteControl. The latter feature comes in really handy to match your widgets with your blog color.

Content  This section allows you to manage all the text of the widget. For Subscribe widget, it gives you two options, either collecting E-mail address only or collecting both name and Email Address.  For survey widget, this section will allow you to choose survey questions along with possible answers for the same.

GetSiteControl-Content

Behaviour  This option lets your select when to display the widget to your visitor. You can either chose to display the widget as soon as the web page is loaded or when a user scrolls certain percentage of the web page or after fixed time. You also have the option to show the widget as exit pop-up.

GetSiteControl-Behaviour  Apart from this, you can set the number of times a widget should be displayed to a particular visitor and also when to completely stop showing widget to the visitor.GetSiteControl also gives you the option to display the widget for a certain period which is useful in the case you are running a promotional campaign.

Targeting  As a free user, in this particular section, you can only select the pages or categories on which the widget should appear. However, Pro and Premium users have the option to either show or hide the widget from users matching specific criteria.

Integration  You can Integrate the data collected from GetSiteControl Contact and Subscribe widget with all the major email managers including Mailchimp, Aweber, Constant Contact, Campaign Monitor, Active Campaign and Mad Mimi. As a paid user, you can also activate Autoresponder from your GetSiteControl Dashboard

Installing GetSiteControl  It is very easy to Install GetSiteControl. If you are using blogger, you can quickly copy/paste the HTML code provided by GetSiteControl into the HTML Gadget of Blogger.
WordPress users can download the WordPress Plugin and install the same on your website like any other WordPress plugin. Post installation, no settings are required on your website to make it work.

Register Free With GetSiteControl        GetSiteControl WordPress Plugin

GetSiteControl Pricing  There are 3 Versions of GetSiteControl: Free, Pro, and Premium. For most people, the free version would be more than sufficient. Though, if you are looking for more features like A/B Testing and want to have more control over whom to show your widget, you should consider upgrading your plan.For the Pro version, you will have to shell out $9/month while the Premium version will cost you $19/month. For annual billing, you get 20% discount.

The only difference between the Pro and Premium version is that the pro version carries a small GetSiteControl branding. For most people including myself, it is not a factor big enough to shell out extra $10/ month. I am currently using the Pro Version. However, considering you get so many features with a single tool, even a premium version will turn out to be cheaper than buying subscriptions for each of these tools separately.

Pros And Cons Of GetSiteControl  GetSiteControl is a great tool for every blogger. However, like any other tool, it does have its pros and cons.

Pros Of GetSiteControl  All necessary widgets packed in a single lightweight tool; Ability to use the widget at 9 locations makes sure you can effectively use all the widgets; Since it is a web-based tool, codes are added for only tools you use, thereby avoiding bloat; Can be used with WordPress as well as Blogger; All the necessary features are free ; and Premium plans are very cheap compared to other plugins with less features.
Cons Of GetSiteControl No option for adding fixed widget to WordPress Sidebar or Individual posts.; No Special discount for multiple websites
Final Words  GetSiteControl is definitely the most feature rich tool that takes care of all your needs to Improve Visitor Engagement. Apart from the two cons mentioned, I do not find any reasons why anyone should not use GetSiteControl. And considering most of its features are free, it is definitely worth trying. However, for fully utilizing the features of this tool, you must at least Upgrade to the Plus version.
Have you installed GetSiteControl on your Blog? If not, do Install it and give us your feedback.


About Aquif Shaikh Aquif Shaikh is a Blogger from Baroda. He loves writing, traveling and sharing his knowledge and Ideas with the world. At Bloggerz Arena, he writes mostly about Making Money Online, Blogging, and SEO. http://www.bloggerzarena.com/getsitecontrol-review/

September 6, 2016

AliPlugin-Make Money With Aliexpress Affiliate Program


Aliexpress is a sister company of Alibaba, one of the largest retailer company founded back in 1999, based in Hangzhou,China and estimated to be worth in between $150 billion to $250 billion. The difference between the two companies is that, Alibaba deals with wholesale or customer looking for manufacturers while Aliexpress is a retail website where customers looking for single item can purchase. Aliexpress affiliate program started back in 2013. However, during this time all their transcation were being held by Commission Junction until late last year when they decided to start their own affiliate program.
Aliexpress affiliate program is open to all members from all over the world. There is no pre-requirement needed and everyone can register on their site. However, you are required to have a bank account since bank transfer is the only mode of payment available for affiliates. The total commission you earn per item depends on the kind of products you choose to promote. Sellers are responsible for deciding if they want to participate in the affiliate program as well as setting their own affiliate commission percentages. However, affiliate commissions usually ranges in between 3.5% – 50% depending on the product you choose to promote.
How Do You Get Paid and How Aliexpress Payment System Works?
All payments are done via a bank transfer. You need to have accumulated atleast $16 before you can request for a withdrawal. Payments are done every month for all completed order. A completed order means the buyer is satisfied with the purchase and releases payment to the seller within 60 days from original purchase date. When you buy something from Aliexpress, you are the one who decides the best shipping option to use, depending on how fast you want the item.  You can choose either DHL, Fedex, China or Hong Kong Post Mail, among others. Incase you choose shipping option like DHL, the waiting time is usually within 4-7 days. For the post mail, it can take in between 15-60 days, depending on which part of the world you are coming from. Most sellers offer free shipping via China Mail or Hongkong Mail. If your item is shipped through post mail, you are given up to 60 days. These 60 days is to give you enough time to receive your goods and to file a complaint with Aliexpress, incase there was a problem with your order.
What Exactly is Aliplugin and How is Works
Aliplugin is an Aliexpress WordPress plugin that allow you to import products from Aliexpress straight from your Dashboard. When you become an affiliate of Aliexpress, you will need to list products to sell to potential customers on your website, this is where this Aliplugin comes in. The Aliplugin will help you to fill up your store within just a few minutes by automatically importing products from Aliexpress.
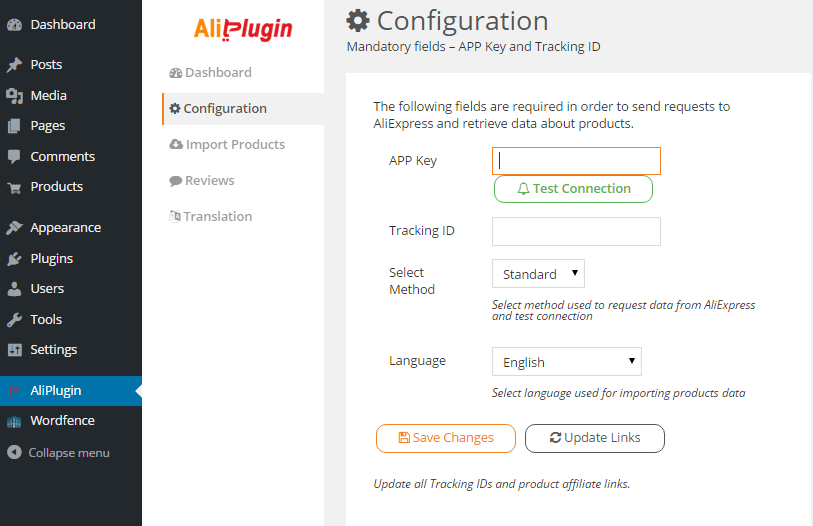
You install the Aliplugin like you normally does with other WordPress plugins and activate it. However, to start using the  Aliplugin, you will NEED YOUR ACTIVATION OR LICENSE KEY, which will be sent through a followUp email after your purchase the Aliplugin. You will also needs an APPROVED APP KEY from Aliexpress and tracking number to use during setup. It takes around 3-5 days for the API to be approved. For the tracking numbers, you are allowed to create upto a maximum of 50.  You can create them on your Aliexpress Affiliate Dashboard under the settings.

Once you have the tracking number and the API ready, it time to get started setting up your site.  Below is a screen shot from Aliexpress Affiliate site showing how to use the Aliplugin. However, you do not have to wait until the 60 days are over,  if you are satisfied with what you have received, you can confirm receiving the goods anytime. Once you have confirmed, the system automatically officially closes the the transcation and the seller payment is released. The affiliate who had promoted this item also get paid once the transcation has been closed.
The next step above is to configure how often you want your site to be updated.  You can choose twice daily, once, never, among other options.  If you made some changes on the description part, you can click on “Do not update description” to make sure it is not updated. Set up all other required details and click on save changes.


You can select the currency of your site and enable currency converter. Finally, the last part in the configuration part is for removing all products from your store, incase you want to start a fresh.
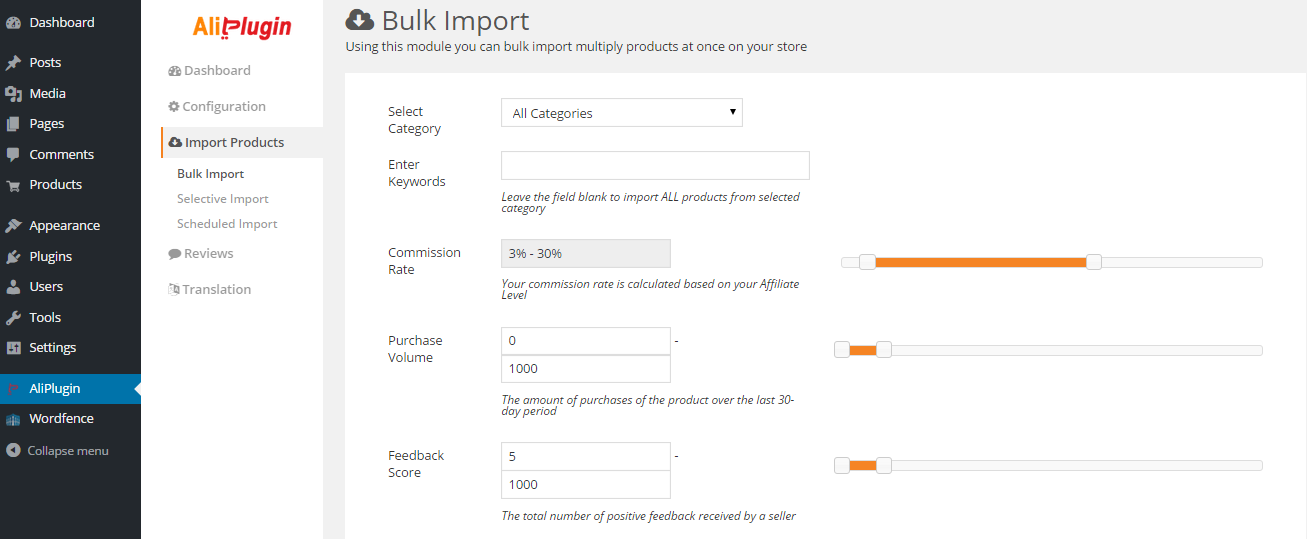
Once you are through the configuration part, you can now move to the importing part. Here you can either choose to import products in Bulk or you can choose Selective import. Selective import is a good option, if you want to only list products with the highest rating on your site.
However, you will need to go through the list of imported products and select ones that fit your criteria.  If you use the Bulk option, the Aliplugin will imports products from the category that you select and assign them to different categories straight from Aliexpress. You can also create your own product categories and assign them.
You can also choose to import products using a keywords. You also can import products using the Selective option. For instance you can importing products from Apparel and Accessories category using a keyword shirts with the following specifications – affiliate commission of 3%-30, no purchase volume and atleast from sellers who have sold a total of 5 products.
 Once you hit the apply filter button, here is a list of products that are displayed. There are total of 587886 products under the keyword shirts. You can assign them categories or just let the Aliplugin assign them one. You also choose whether you want them published immediately or to be kept in draft form.
Now, you can select the number of products you want to import or just select them all. You can also select products to list on your site based on other options such as volume. Just click on the word “volume” link to see the total number of products bought and their ratings.
Once you have selected the products to import, the total amount of products to be added to your site will be shown next to import button.  Just click on it and the products will automatically be listed on your site with current prices and description. If you want them to have customers’ reviews, you can import reviews using the review option.
For More Information Visit The AliPlugIn Site Here

Aliplugin also comes with premium themes exclusively for Aliplugin customers. So, once you buy the Aliplugin, you also get a very nice theme.  I honestly thank the developer for this wonderful free theme, which he is giving to Aliplugin customers for free.

Source : http://www.reviewearn.com/aliplugin-review-make-money-with-aliexpress/

August 20, 2016

Boost Your Affiliate Commissions : Writing Your First Classified Ad

By harmen Junior

This article discusses of the methods you’ve probably not heard of, whereas other methods you’ve thought would never work. In a real essence, it’s really only a matter of doing it right and you can make a living off affiliate marketing. Which is really fascinating, because you can earn big commissions just promoting products you DON’T even have to create! Of course, like everything else in life, it takes multiple practices to reach the top level.
But I assure you that through the coming pages, I can help you reduce your learning curve significantly and you will make less guesswork… and mistakes! I have written this article as short and precise as possible. Because I know you’re a very busy individual (and it takes no guess), and above all, I also know that you’re excited and that you can hardly wait.
Without further ado, let’s quickly cover the methods you can use in boosting your affiliate promotion… and the commissions!
How to Using Classified Ads
The process of using classified ads to generate sales for any product – whether it be an original product or an affiliate product – is often over-simplified and discouraged. This is, in part, because it actually is one of the harder ways in which you can advertise. It requires you to use a small amount of words to communicate an important point,which will either make or break your ability to garner interest in the product in question. In most cases, supposed experts will discourage you from using classified ads because they themselves have never had much luck using them – NOT because classified ads aren’t a viable method of advertising.
Classified advertising is a truly great business building tool you can use to generate dozens and dozens of leads for your service business. Whether your target market(s) is based locally or further away there are publications, trade magazines, newsletters, and newspapers that will be read by your prospects. Placing small ads in the classified advertising section of these publications will generate leads for you.
Writing Your First Classified Ad
Classified ad writing can be considered an art form due to the fact that you have very limited space advertise to leads. Your goal should be to post often and get to the point quickly. Here my tips that can help you compose your classified ad in a way that will generate leads. This will work for paid and free ads alike.
Target Your Prospects It's imperative that you target your prospects. If you are writing your classified ad in a way that targets everyone then you will not reach anyone.Your objective should be to focus on your target group and address their pain points.Focus on your niche market and write your ad in a way that directly correlates with what they need.
You should be thinking about the age, gender, lifestyle, and income group you are looking to target.When you figure out your group target write you classified as in a way that directly speaks to them. In the end this will give you the best opportunity to generate targeted prospects for your business that are looking to buy.
Have an Amazing Headline A headline alone can make or break an ad.You should spend your time focusing on a headline that is going to capture this groups attention.Once you have figured out the group you want to target you want to compose a headline that's going to get them to click. Your headline to explain what's in it for them if they click.
Although you won't have much space for a long headline it should be written in a way that gets their attention and makes them want to click to learn more.Your headline should be unique, ultra-specific, useful to their problem, and should create a sense of urgency in their minds.If you can write a headline that covers these four things you can get targeted prospects clicking your ad for more. Even if you can cover two out of the four your chances of them clicking are better than none.
If you take the time to master these two things you will be well on your way to getting the most out of your efforts. Do not forget to focus on your target group and move them emotionally.People respond to words that can get them thinking or make them feel a certain way.If you can connect with them on an emotional level you can get them to click and potentially gain a customer for life.
Remember! Make It Simple but Work
With classifieds, you’re not paying by the click. It’s either free or you’re paying for a certain period of time or impressions, so your goal should be to generate as many clicks as possible, so use words like “cheap,” “free,” “proven,” and “shocking” to draw attention to your ad.

Once you have successfully drawn attention to your ad through the headline, you will then want to seal the deal by providing viewers with a reason to click through, provided that your affiliate product is something they will want to buy. You can do this by explicitly stating a quantifiable benefit in the second line of the classified ad – and then stating a crucial feature in the third line. Once you have gained some experience posting ads on free classified ad mediums, you will want to move on to major electronic publications, including large e-zines and authority sites; however, before you do this, you could be confident in the classified ad and your conversion rate.

August 6, 2016

CB Affiliate Magic, Create Stunning Product Catalogs for Your Website


CB Affiliate Magic Reviews – What is it ?

CB Affiliate Magic is the first Product Catalog Creator application developed for Clickbank Marketplace and the only software available in the market that enable Clickbank Affiliate Marketers to create Stunning Product Catalogs within 60 Seconds. This is an easy to use Application – no complicated Installation or Setup is necessary. This is a fully newbie friendly Software.
CB Affiliate Magic App can be used to Create Catalogs in 189+ Niches given in Clickbank™ Marketplace.  Users can create catalogs within a minute and Generated Catalog HTML Code will be ready to copy and paste in a website, blog or Facebook page. There are no restrictions on the number of Catalogs user can create. These Product Catalogs can be hosted in a Website, Blog or Facebook Page.
CB Affiliate Magic App also enable the user to enter a Catalog Title, Short Description and options to change the color settings. And Addition Options: User can Embed Additional links in the Catalog. This can be links to their Website, Blog, Opt-in Subscription page, new offer page or CPA offers.  They also will be able to Insert a Banner or Logo image. A Review video can also be inserted in a catalog.

>>> Click Here To Learn More CB Affiliate Magic ! <<<

CB Affiliate Magic  – Why Should Choose It ?
Here’s How Users can Make Money Using the Clickbank Product Catalogs Created using CB Affiliate Magic™


>>> DOWNLOAD YOUR COPY NOW ! <<<

CB Affiliate Magic™ is the first Product Catalog Creator application developed for Clickbank™ Marketplace. CB Affiliate Magic™ is the only software available in the market that enable Clickbank™ Affiliate Marketers to create Stunning Product Catalogs within 60 Seconds.

This App can be used to Create Catalogs in 189+ Niches given in Clickbank™ Marketplace. You can create catalogs within a minute and Generated Catalog HTML Code will be ready to copy and paste in a website, blog or Facebook page.

This is an easy to use Application – No complicated Installation or Setup is necessary. This is a fully newbie friendly Software.

Here is what you will get in this Offer:
CB AffiliateMagnet Application
Video Tutorials
Free Software Updates for the next year
Unlimited Use Rights & Developer License
Priority Technical Support

30 Days Money back guarantee